On Monday, I took my new Celestron C5 spotting scope out to view a nesting Great Horned Owl. The scope kit comes with a standard eye piece for optical viewing. However, they also offer an adapter that allows a camera to mount to the scope for use as a super telephoto lens. This was my main objective when I bought the scope.
Monday was my first time setting up the scope with the camera mounted on it. There are some technical details to take into consideration when photographing with a long focal length. I also use a 400mm lens that has similar issues, although not as exaggerated.
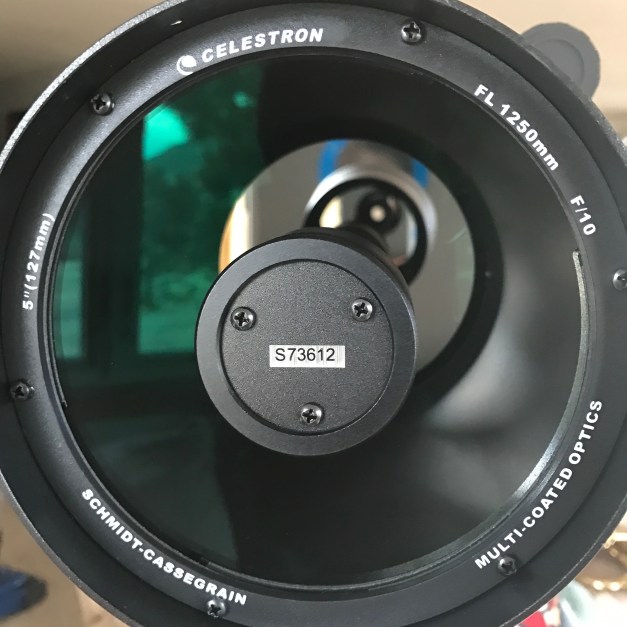
This is looking into the front of the Celestron C5 spotting scope. The technical specs are shown around the perimeter: focal length of 1250mm with an aperture of f/10 making the primary mirror diameter 127mm. There is also no image stabilization.
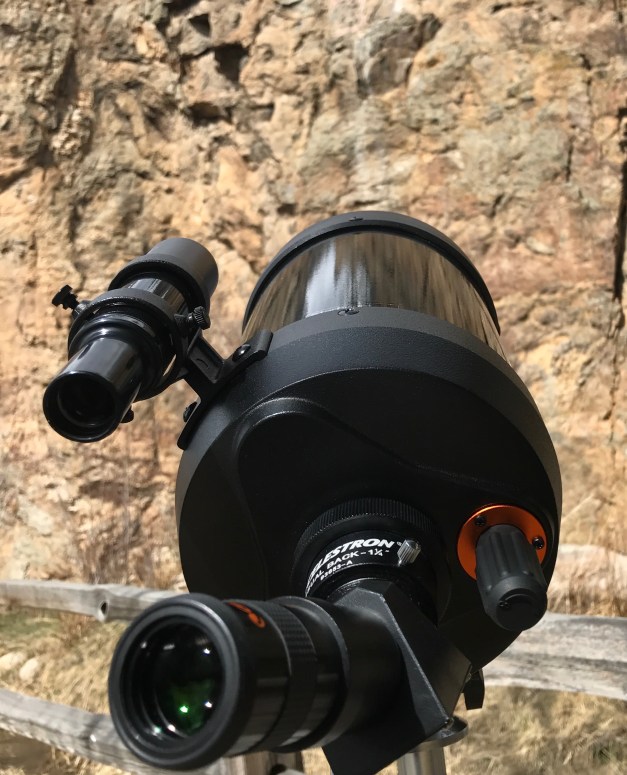
The owls have nested around this location for several years. I setup the scope with the eye piece to get the scope pointed at the right location. Then, removed the eye piece and attached the camera on the adapter.

The above photo is with the camera on “live view” mode. I ran into a few issues with live view. First, there was glare from the ambient light on the screen. Second, in order to view anything on the screen, I had to adjust the shutter speed to a much longer exposure than was required for the actual exposure. I am guessing this is due to the camera not having the aperture information to calculate the overall exposure when displaying the image on the screen. The camera is more than likely reading the light within the scope itself, which is much darker than the ambient light within the scene.
As I mentioned in the technical information about the scope, the aperture is fixed at f/10. This means I am controlling the exposure with adjustments to shutter speed and ISO. The general rule of thumb to freeze camera motion is to use a shutter speed equivalent to or greater than the focal length. In this case, that means faster than 1/1250th of a second. This is where having a camera with good high ISO performance comes in handy. It turns out that the rule of thumb of placing ISO and shutter speed equivalent to each other gave me the proper exposure for the scene. I went with ISO 1600 and shutter speed of 1/1600 at the fixed aperture of f/10 provided from the scope.
This may sound like over kill. Yes, I could have used ISO 1250 and shutter speed of 1/1250. However, there was a slight breeze which added motion to everything, and I wanted to make sure I was getting the fastest shutter speed to freeze the motion as much as possible. This is not talking about the owl movement, which would have been frozen at a much slower shutter speed of possibly down to 1/500th or slower (since she was not moving that much). I am strictly speaking about the subtle shake in the camera setup on the scope.

This is the resulting image. There are a few more tricks to reduce camera shake. I already mentioned one of them above: shoot with live view. Live view inherently locks the mirror up which reduces the “mirror slap” that occurs during a normal exposure. The camera also has a mirror lock up function, which is the mode I ultimately used to take the photos. Mirror lock up requires a double press of the shutter release button. The first press locks the mirror up. The second exposes the image.
There are drawbacks to this, as the timing of events in the scene may change by the time the photo is exposed. I did not time the actual sequence, but I am guessing there was around a two second delay between the first shutter click and the second shutter click to allow for the shake to minimize from the mirror flipping up.

After the mirror flips up, I can no longer visibly see what is in the view finder. This means things can change in the time it takes to hit the shutter to expose the image. For example, when I started the process for this image, the owls eyes were open. By the time I hit the shutter to expose the image, she was blinking. It was an odd coincidence to capture this moment. Had I seen her blink, it would have been too late to capture the moment, due to the delay from the mirror locking up and hitting the shutter release the second time to expose the image.
This can be reduced by shooting the images with live view. However, the exposure setting to view anything on the screen was not appropriate for the exposure of the scene. This resulted in a blank image full of white pixels since everything was overexposed. Again, I am unsure if this is due to the camera not having the aperture information to assist with calculating the exposure to display on the screen. Canon EF lenses communicate aperture information with the camera body.
Lastly, I was also using a remote trigger for the shutter release. This allowed for hands free operation of the camera to further reduce motion of the camera. Using the shutter release button on the camera requires a press which in turn induces motion into the setup. The remote shutter release removes this induced motion.
At any rate, I was thrilled with the results from my first attempt to use the Canon 5DIII mounted on the Celestron C5 spotting scope! I am looking forward to more trips out into the field with the setup. I am sure I will get more familiar with the intricacy of shooting with the setup.

Awesome Photo
It would seem this camera would be great for scope photography, with it’s 5 stops of in-camera, 5 axis image stabilization: https://www.dpreview.com/products/olympus/slrs/olympus_em1ii
Yes. Plus, it is mirrorless which reduces the vibrations from a mirror flipping up and down.